UI Overview

Satellite Connections

We connect to the satellites by utilizing the built-in USB-c cable from the Groundhawk device. The technology inside the device allows us to gain connections and map accurately.
The device tells us how good our connection is continuously while using Groundhawk. The colors mean the following:
Green = Very accurate satellite location. This mode is required to get started.
Yellow = Impaired satellite location. The measurement can be continued momentarily (about 20-30 seconds).
Red = poor satellite location. Mapping cannot be done. Wait for a better signal or go back.
How Groundhawk works
Groundhawk is capable of precise positioning of only centimeters in a green state, utilizing the RTK correction signal from a mobile network. For comparison, a mobile phone satellite connection usually locates itself with an accuracy of 3-5 meters. Groundhawk has sensors and a camera for exact positioning, so a momentary loss of connection does not affect the mapping accuracy.
Tips for connection troubles
1. Always aim to start mapping in a green state. Finding the satellite connection should not take longer than two minutes. When trouble connecting, start over by unplugging the USB cable and then plugging it back in.
2. The status should always be green – but if for some reason you cannot get a signal at your site, but can move a bit further away, you can start the recording further away and walk to your desired start point
3. Once the status turns from Green to Yellow you have about 30 seconds before fully losing the signal
4. If the status is Red, you should not start recording, but instead try and find a better area to start in – you can also map from end to start if the signal at the end is easier to get
5. Look for a better connection in a more open place nearby. Often there's a spot with good visibility towards the horizon within a 20-meter radius. You can very well start mapping there and only walk to the starting point when aiming at it.
Map from another direction. Start mapping at the other end if the connection is found more easily there.
Good to know
1. Sometimes, especially in a dense forest or in immediate proximity to a building, it can be difficult to establish an accurate satellite connection signal. Restart the device next to the cable trench in as open a place as possible to ensure an accurate signal
2. Satellites lie typically in the direction of the horizon. The better visibility Groundhawk has in all directions, the better are the chances for a good connection
3. In case the conditions prove to be exceptionally challenging, keeping the device in place and lifting it higher might help
4. Some intentional satellite interference occurs. It may affect air traffic from hundreds of kilometers away, but on the ground level it's difficult to make a disturbance from closer than 50 km
5. Strong solar storms that occur as northern lights in the dark occasionally interfere with the satellite positioning
Choosing a Site
Choose or search for an existing site or ask your Project Manager to create/assign a specific site.
When a Project Manager assigns you a site, it will be visible on your device.
Good to know:
- If for some reason you do not see the site that should be there, talk to your project manager, as they must give you the correct permissions for the site to show up for your user - *you should only create a new site if told to do so by your Project Manager*
Choosing a Mode

Good to know:
Remember, there are three different modes to choose from:
1. Trench route. Use this operating mode when you are about to do basic open trench mapping.
2. Surface route. Use this operating mode when i) the trench is filled up, or ii) when you are mapping after cable is plowed or micro-sawed into the ground. In this mode, you enter the depth manually every 5 meters. (This mode was previously called plowing mode.)
3. Point. Use this operating mode to map the exact location of an individual point (e.g. pole, cabinet or joint).
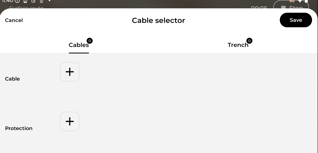
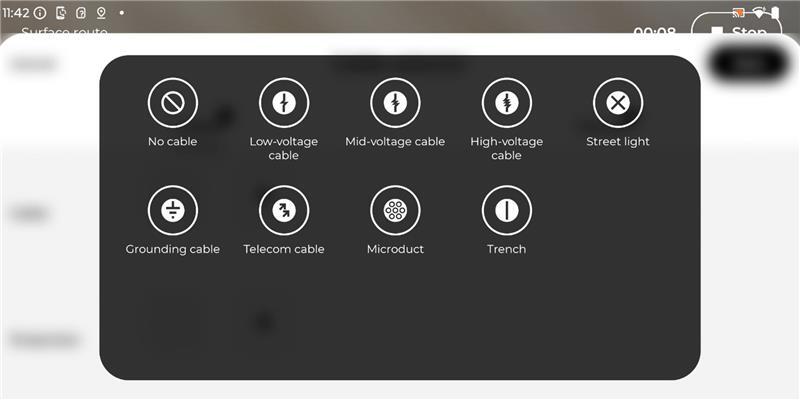
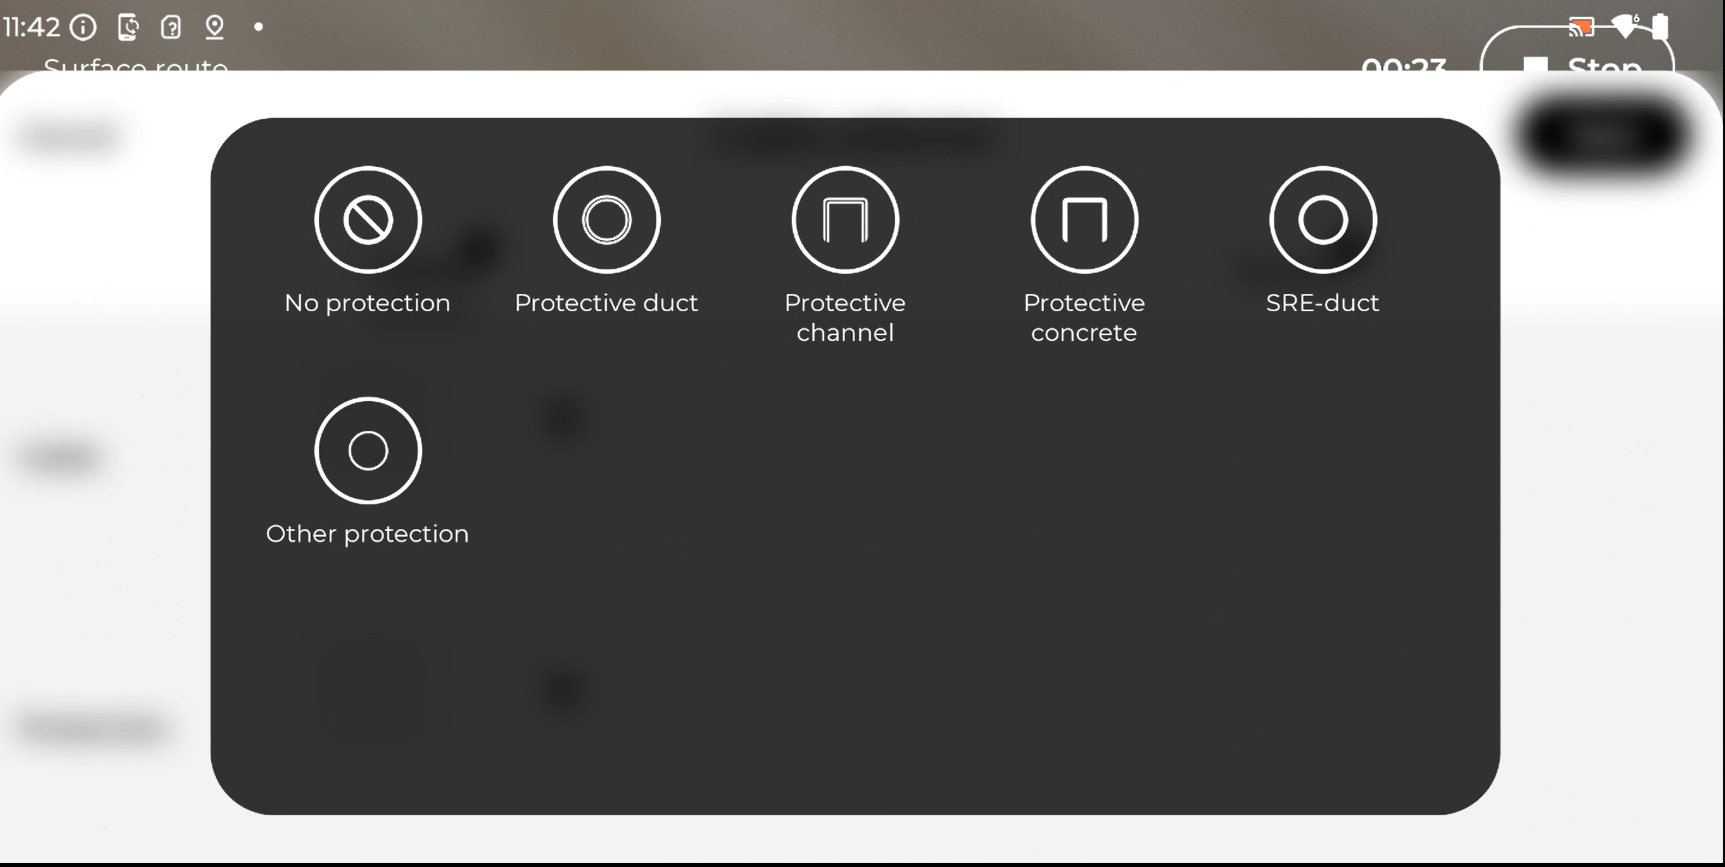
Cable/Protection Selection
- You can choose up to three parallel cables and their related protections separately for your cable trench.
- Make sure that the cable selections always match the cables in the trench and their correct order from left to right.
- Whenever the protection changes (e.g. the gutter starts or ends), mark the new cable protection and the exact starting point.
Extra Trench Features
Adding these extra trench features help with gathering statistics - which is how we see how much work has been done
- Trench Covers: This refers to the environment in which you are working - asphalt, soft soil, concrete, etc.
- Logical Network: This refers to the cables planned route - there can be main distribution lines or customer lines ‘house connections’ or transport (fiber from one point to another without any ‘house connections' between
Point Mapping & Photos
Point Mapping
- Here is a list of objects that will open on your screen

- For objects that might need a description such as a cabinet number, please enter that in the description box. Measured depth is only for providing manual depths, for example in case the trench is being filled with water and user wants to manually enter the depth at that location
You can capture feature points either while mapping or while in a separate point mode. Aim at the object you want to capture and when you are ready select the type of point you want to map
Photos
- It is a good idea to take at least these photos before and after your mapping project:
- photo of an overview of the trench

- photo of a particularly interesting point of the trench

- photo of markings in the distribution cabinet
- A photo is geotagged where the camera is, i.e. in the hand of the user. A point measurement is geotagged in the trench, i.e. where the aim is pointed
- After photos are good to show how the route was left when finished. Again, it is good to have evidence in case of claims
Using the Map
This feature is used to:
- Review plan & cadastral borders (property lines) on site
- Compare/review as built mapping - see how what has been built compares to what was planned
- Comment on map - which is seen by our Groundhawk team and they can then assist with any issue
Statistics
Statistics are gathered through the process of mapping. We count how much cable, protection, trench, etc. has been mapped
We can use the statistics to:
- Check the progress of the build
- Review the routes in each terrain – and double check to make sure it is correct
- If there are any issues/mistakes please add a comment to the map directly and our team will take care of it
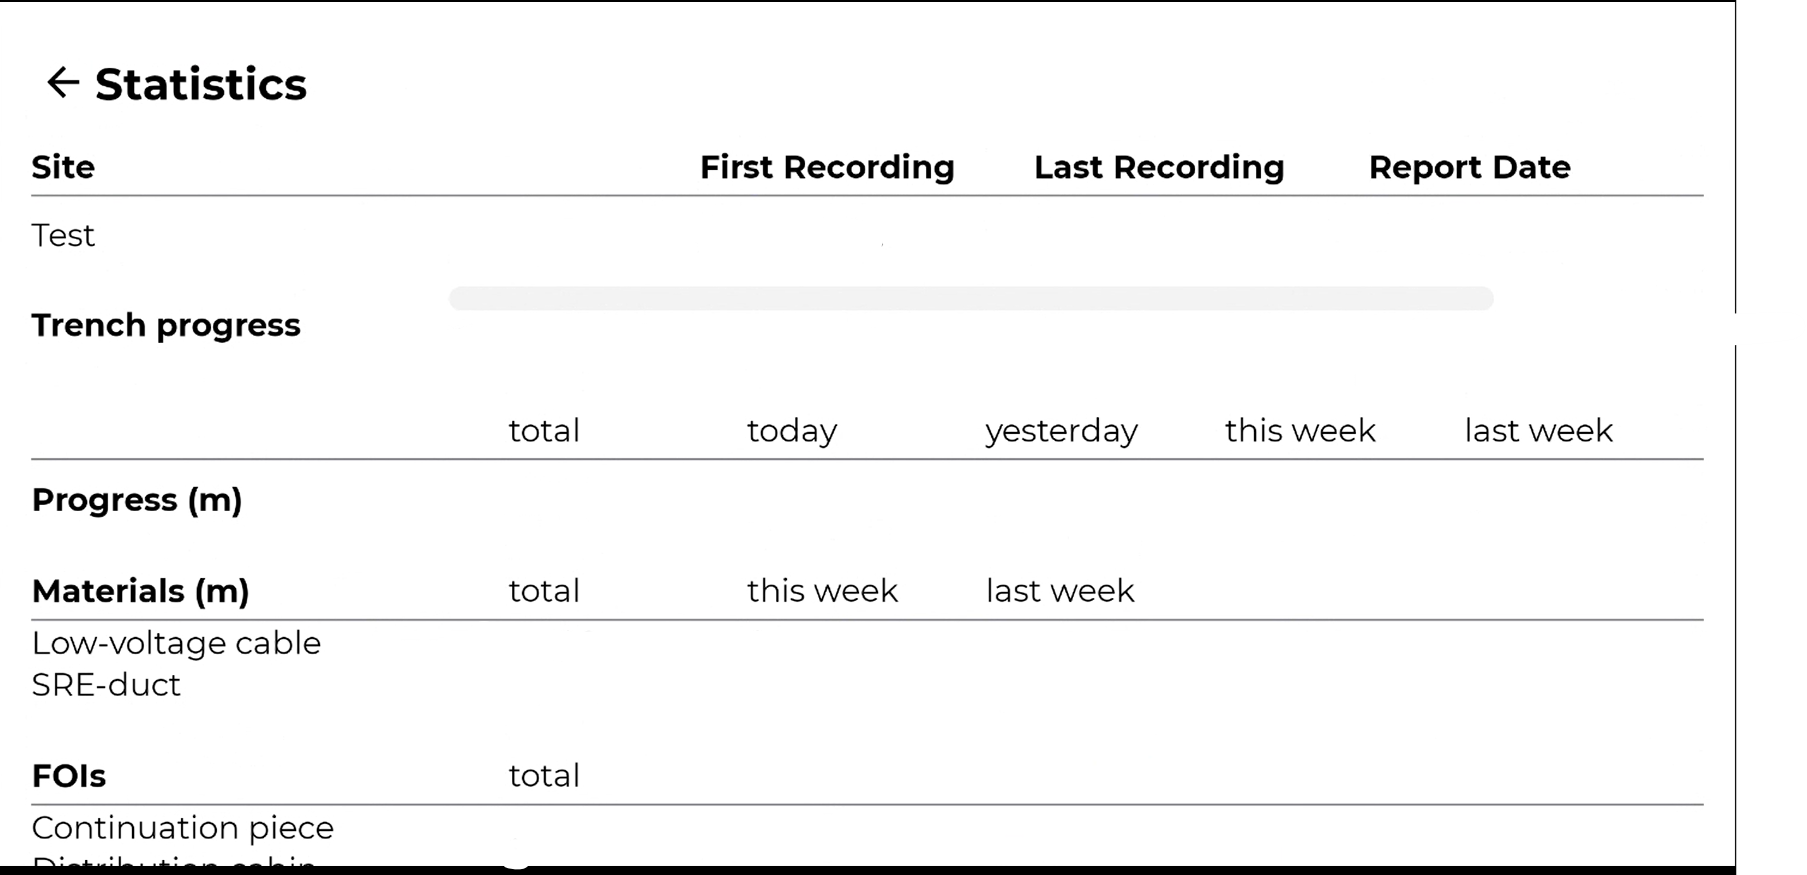
Good to Know:
- The statistics are updated automatically at the end of every day - so you will be able to double check them the day after mapping
- Double check cables/protections daily to make sure there are the correct amounts, types, and lengths accounted for
- Parallel lines/cables count as double - if there has been an area where the cable has been mapped twice, the statistics count it twice. Our team will fix these faults when checking the site. Then the statistics will down as now there is only one cable
- If you notice this has happened - add a comment on the map to resolve the issue as soon as possible
IMEI Information
IMEI is used for managing devices and easily updating software
How to find the IMEI on your phone:
-
Open your phone's Settings
-
Use the search bar and type 'IMEI'
-
Select the option that shows IMEI (SIM slot) or similar
-
Your IMEI number will be displayed on the screen